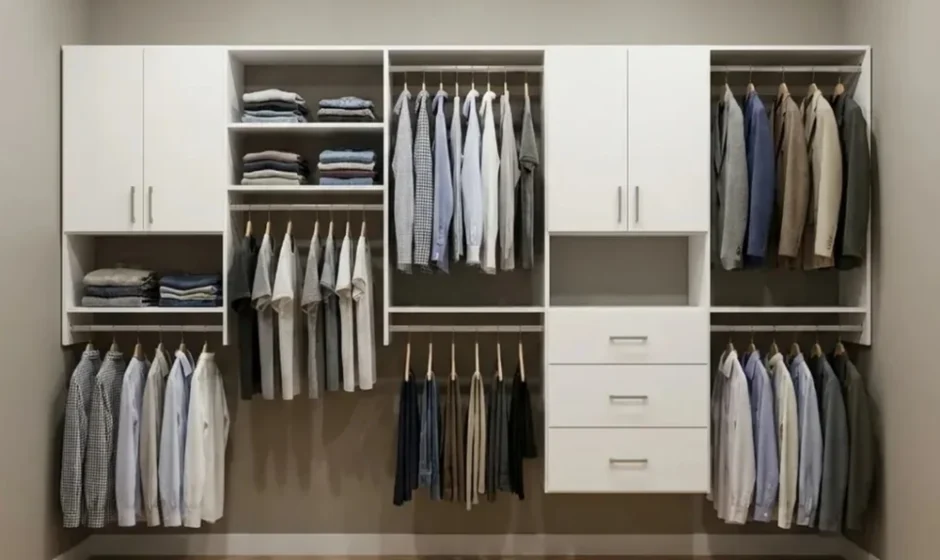

You do not need a blank check to build a walk in closet that works and looks sharp. I help homeowners set clear goals, make smart layout choices, and invest in features that give strong daily value. The advice below comes from practical builds, hard lessons, and budgets of all sizes. You will see what to measure, what to prioritize, and where to spend or save.
If you live in Middle Tennessee, a custom walk in closet from National Closet Company can fit a wide range of budgets. They back clear pricing with photorealistic designs and skilled installation, which makes planning and cost control far easier.
Start With a Clear Goal and a Number
Before you pick finishes, decide what the closet must do for you. Write down three goals you refuse to compromise.
- For example: fit 60 pairs of shoes, add a full-length mirror, and keep 36 inches of aisle space.
Now choose a budget tier.
- Lean build: under $2,000
- Mid-range: $2,000 to $6,000
- Premium: $6,000 and up
This helps every choice that follows. If a feature does not serve your top goals, leave it out or delay it.
Measure and Map the Room
Accurate measurements save money and avoid change orders.
- Measure wall lengths corner to corner.
- Mark ceiling height in at least three spots.
- Note door swings, windows, vents, outlets, and light switches.
- Photograph each wall with a tape measure in view.
Sketch a simple plan. Add any sloped ceilings, soffits, or low bulkheads. A clean map lets you size sections with confidence.
Use Proven Layout Rules
Good layout beats fancy finishes. Use these planning numbers as a guide.
- Aisle width: 36 inches feels comfortable. Do not go under 30.
- Island clearance: 36 inches on all sides. If you cannot keep that, skip the island.
- Hanging depths: 12 inches for shirts and blouses. 14 inches feels better for coats and bulky items.
- Rod heights:
- Double hang: two rods at 40 inches and 80 inches from the floor.
- Long hang: one rod at 66 inches from the floor.
- Shelves: 12 to 14 inches deep for folded clothes and shoes.
- Shoe shelves: 7 to 8 inches between shelves for flats and heels, 10 inches for boots.
Corners can waste space. Use hanging on one wall and shelves on the other to avoid rod collisions.
Plan Storage Zones by Your Wardrobe
Count what you own, not what a catalog suggests.
- Long hang: dresses, coats, and suits
- Double hang: shirts, blouses, and pants folded on hangers
- Drawers: undergarments, tees, workout gear
- Shelves: denim, sweaters, handbags
- Shoes: divided by type
- Accessories: belts, ties, jewelry, hats, and small items
Allocate sections based on that count. If shoes are your main need, give them a full run. If folded knits take space, add more adjustable shelves.
Budget Paths That Work
Here is how I would plan across three budget levels without regret.
Lean Build
- Keep layout simple. Use wall-mounted systems with open shelves and a few drawers.
- Use more double hang and fewer long-hang areas.
- Add ready-made baskets for seasonal items.
- Choose a white melamine finish and standard hardware.
- Install a single ceiling light with bright, neutral bulbs.
- Add a wall mirror and a compact valet hook near the door.
This build solves storage and keeps the space bright and clean without expensive parts.
Mid-Range Build
- Mix open shelves with a drawer bank in the dressing zone.
- Upgrade to 14-inch deep shelves for better fold size and shoe support.
- Add dedicated pull-outs for hampers or belts and ties.
- Use LED strip lighting under select shelves for display and task light.
- Add a bench niche or a shallow tower for handbags.
- Choose a woodgrain finish that suits your trim and doors.
This level feels custom and stays inside a reasonable range.
Premium Build
- Add a centered island with drawers for jewelry, watches, and small items.
- Include glass fronts on select drawers and display shelves for handbags or hats.
- Integrate LED lighting in vertical panels and inside cabinets.
- Use soft-close hardware across the closet.
- Add a pull-out mirror, valet rods, and a built-in hamper with lids.
- Consider a floor-based system for a furniture look and higher load capacity.
This tier creates a boutique feel and smooth daily use.
Finishes, Lighting, and Hardware
- Finishes: White feels clean and bright. Light woodgrains hide dust and scuffs. Dark tones suit larger rooms with strong lighting.
- Lighting: Place overhead light near the centerline. Add LED strips under shelves that face the user. Avoid light behind hanging areas that cast shadows.
- Hardware: Keep pulls simple and consistent. Brushed nickel or matte black pair well with most doors and trim.
Build vs Buy: How to Decide
- If your space has simple walls and no tricky corners, a modular system can serve you well.
- If you want an island, integrated lighting, or flawless corners, custom design pays off. It gives you exact sizing and stronger fit and finish.
Why I Recommend National Closet Company
If you want a custom plan in Nashville or across Middle Tennessee, consider National Closet Company. Here is why I point readers to them:
- They avoid franchise fees and national markups. That helps budget control.
- They build to exact measurements and use furniture-grade materials in a wide range of finishes.
- They show photorealistic 3D designs before you commit, along with an exact installed price.
- Their standard shelf depth is 14 inches, which adds real storage over the common 12-inch depth.
- You can choose wall-mounted systems for a lighter look or floor-based systems for a built-in feel.
- Two options fit different budgets: a standard install where you handle paint and prep, or a turnkey path where they handle removal, repairs, and paint.
- Installers finish work with clean edges and a clear schedule.
This mix of design clarity, material quality, and pricing transparency gives strong value across budget levels.
A Simple Planning Checklist
Work through this list in order.
1. Define three must-have goals and a firm budget.
2. Measure every wall and mark obstructions.
3. Count your wardrobe by category and type.
4. Choose layout: double hang vs long hang vs shelves.
5. Set aisle width and decide on an island only if space allows.
6. Pick finish, hardware, and lighting plan.
7. Add one or two accessories that solve daily pain points.
8. Stage installation: clear the room, patch holes, and paint.
9. Load the closet by zone and label a few shelves that tend to drift.
Final Thoughts
A smart walk-in plan does not start with finishes. It starts with goals, space, and the way you dress. Build to those needs, adjust depth and spacing to fit real items, and invest in lighting where you use it most. If you want a clear design path and an installed price you can trust, National Closet Company is a strong partner for Middle Tennessee homeowners who want custom work without guesswork.